How to run a Git server on Windows with IIS
Have you ever wanted to host your own Git repositories on Windows? It's not as hard as you might think. This article describes how to get a Git server running on IIS that will let you securely push and pull to the remote server from your local client, just like you would with GitHub, Bitbucket, or Gitlab.
The server described here won't give you a web interface to browse files, view commits and all those other browser features that services like GitHub give you. But not everyone needs those features. You might be happy viewing history and commits with Git's built in command line tools, or a more visual tool like GitHub Desktop. You could even build your own web-based user interface.
Why would you host your own Git repos?
- Maybe you don't like the idea of your private code sitting on someone else's server
- For open source projects, maybe you don't like the idea of GitHub Copilot ripping off your code and selling it without compensation or attribution.
- Maybe you don't want your development process to be dependent on a third party service; where outages, product discontinuations, API changes, and price hikes can cause headaches if you're locked in to their services.
- Maybe you can save money compared to a Git hosting service, or bypass limitations (e.g. storage, user limits) on their free plans.
- Maybe you want faster git remote operations. I've found that when hosting my own repos on a server near me, pushes to the repo seem about twice as fast. Since I also use git pulls during deployment, this makes the push/deploy process seem a lot faster, especially when the production server is hosting the git repo.
- Maybe you just want to gain a better understanding of how Git hosting works.
Prerequisites
All you need is a Windows server with IIS installed. If you have Git installed already that's great, otherwise instructions for installing it are below. It will also help if you have familiarity with configuring IIS (e.g. binding to an IP address or domain name) and Windows (e.g. setting file and folder permissions).
The setup process
Step 1. First, make sure Git is installed on the server. I like to use Scoop for this and do a global install. One benefit of using Scoop is that you can upgrade Git versions without the path to the Git executable changing. The importance of that will become apparent when we set up the CGI path in IIS.
scoop install --global git
Step 2. Then, make a directory on the server that will house your hosted Git repositories, e.g:
mkdir \inetpub\sites\git
Step 3. Create a new Windows user account that can be used to authenticate remote clients and authorize access to repositories. You can of course create multiple accounts if you want fine-grained controls of different users rights to access different repositories, but I'll keep it simple here with a single user.
Since this user will only be accessing the server via a web endpoint, I like to disable remote desktop access for this user by going to Remote Desktop Services Profile and ticking the Deny this user permissions to log on to Remote Desktop Session Host server box.
Step 4. Using directory permissions, give this user full control over the directory you created in step 2. Right click the folder, go to Properties > Security and then click Edit. Click "Add...", type in the name of the user you created in step 3 and then tick the Full control box in the Allow column.
Step 5. Set up a "bare" repository on the server. A bare repository has no working copy, just the files you would normally find in the .git directory. The convention is to use a .git suffix for bare repositories.
You can either initialise an empty repository:
git init --bare myproject.git
... or clone an existing repository that's sitting on another server:
git clone --bare https://username@bitbucket.org/username/myproject.git myproject.git
Step 6. Create a new website in IIS Manager running in it's own application pool. To begin with I suggest using an HTTP binding while you're testing.
Take note of the application pool's name, then open (as Administrator) C:\Windows\System32\inetsrv\Config\applicationHost.config. Look for the application pool for the website you just created and edit it to set two environment variables that Git will need.
E.g. if your application pool is named "git" and the directory you created in Step 2 is "C:\inetpub\sites\git", then you would have something like this (under configuration > system.applicationHosts > applicationPools):
<add name="git" managedRuntimeVersion="">
  <environmentVariables>
    <add name="GIT_PROJECT_ROOT" value="C:\inetpub\sites\git" />
    <add name="GIT_HTTP_EXPORT_ALL" value="1" />
  </environmentVariables>
</add>
Step 7. Open Server Manager, go to Server Roles and make sure that Basic Authentication and CGI are both enabled.

If these roles weren't previously enabled, you may need to restart IIS and IIS Manager for the new functionality to become available.
Step 8. In IIS Manager, add a new Script Map under handler mappings:
- Request path: *
- Executable: the path to the git-http-backend.exe executable that should come with every Git installation. Because I installed Git with Scoop, this path for me is: C:\ProgramData\scoop\apps\git\current\mingw64\libexec\git-core\git-http-backend.exe.
- Name: I called this mapping "Git Smart HTTP" as this is the name of the Git protocol we're using.
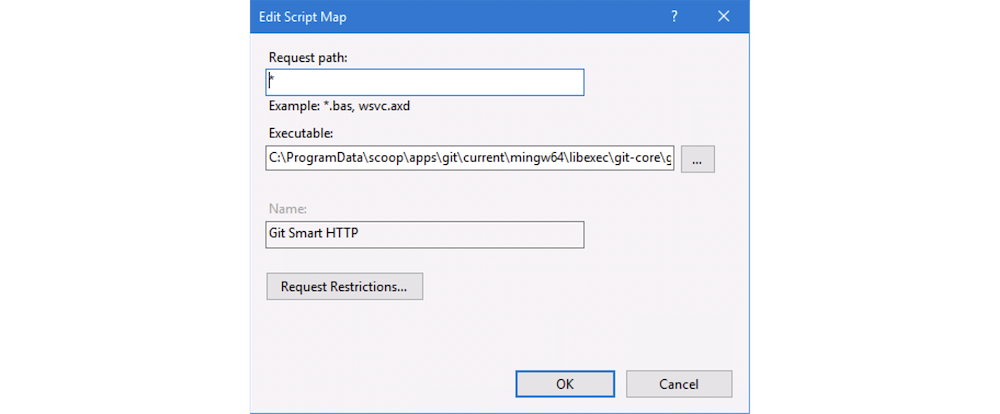
Click on "Request Restrictions..." and uncheck the box for "Invoke handler only if request is mapped to:".
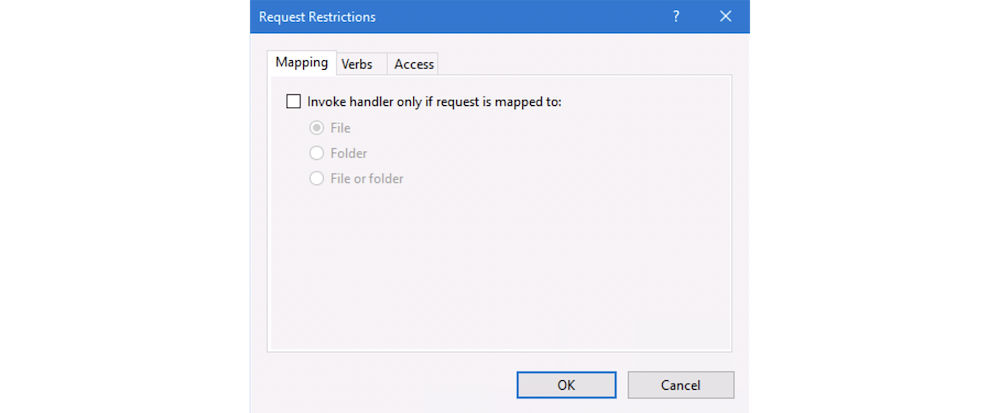
The default settings on the other tabs should be fine; i.e. the handler should be invoked for all verbs and access required by the handler is "Script".
Step 9. In IIS Manager, go to Authentication settings for the Git website. Disable Anonymous Authentication and enable Basic Authentication.

Step 10. You should now be able to access the git server remotely using the git client on your development machine. Make sure the website is running in IIS Manager
e.g:
git clone http://git@git.myserver.com/myproject.git
You should be asked to authenticate at this point. Use the credentials for the Windows user account you created in Step 3.
You should be able to write/push back to the server as well.
cd myproject
touch test.txt
git commit -am "Testing"
git push
If you created an empty repository in Step 5, you might like to push an existing repo onto it instead of cloning the empty repo, e.g:
git remote add origin http://git@git.myserver.com/myproject.git
git push -u origin master
Step 11. Once you know it's working over HTTP, you might now like to set up HTTPS. I used WinACME to get a certificate and added it with an HTTPS binding in IIS. I removed the HTTP binding completely.
References
[1] https://git-scm.com/book/en/v2/Git-on-the-Server-Smart-HTTP
[2] https://git-scm.com/book/en/v2/Git-on-the-Server-Getting-Git-on-a-Server